Vinyl records, once deemed relics of the past, have made a triumphant return, spinning their way into the hearts of audiophiles and music enthusiasts alike. In this age of digital streaming, there’s something undeniably nostalgic and authentic about the rich, warm sound that emanates from a turntable. However, to keep the vinyl groove alive and kicking, one must dive into the realm of turntable maintenance.
The Resurgence of Vinyl

Why the sudden surge in popularity? In an era dominated by streaming services and digital downloads, the comeback of vinyl records might seem like a paradox. Yet, music aficionados are finding solace in the tangible and tactile experience of handling vinyl. Brooklyn, New York, a city known for its eclectic music scene, has been at the forefront of this vinyl renaissance. The Brooklynites have rediscovered the joy of browsing through dusty crates in record stores, unearthing hidden gems and forgotten classics.
Understanding the Components
The Anatomy of a Turntable
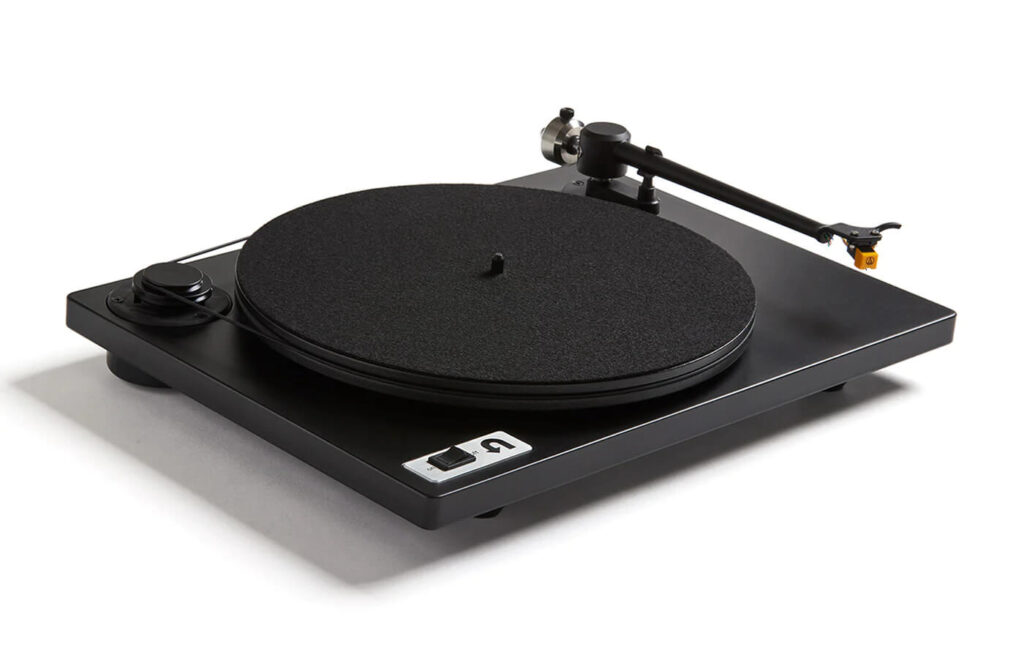
Let’s strip down the turntable to its bare bones – well, not literally, but you get the idea. Each component plays a unique role in the symphony of sound that graces your ears. Here’s a quick rundown:
| Component | Function |
| Plinth and Base | The foundation of the turntable, providing stability and vibration control. |
| Platter and Mat | The spinning stage where your vinyl rests, with the mat reducing friction and improving grip. |
| Tonearm and Cartridge | The tonearm houses the cartridge, responsible for tracking the grooves on your records. |
| Belt/Drive Mechanism | Dictates how the platter rotates – belts provide a smoother operation, while direct-drive offers more precision. |
Importance of Each Player
Why does each component matter? Well, it’s like having a band where every member contributes to the magic. If one instrument is out of tune, the whole performance suffers. Similarly, if any turntable component is neglected, it can lead to issues like distorted sound, skipping, or uneven playback speed.
Identifying Common Woes
Ever had your turntable throw a tantrum? Here are some common issues and their potential culprits:
- Skips and Jumps: Check the stylus for wear or debris.
- Uneven Speed: Belt or drive mechanism might need adjustment.
- Distorted Sound: Cartridge alignment or stylus condition could be the culprit.
Now that we’ve had a crash course in turntable anatomy, let’s move on to the nitty-gritty of maintenance.
Cleaning and Dust Management
Brushing Off the Dust
They say cleanliness is next to hi-fi-ness, or something like that. Dust is the arch-nemesis of turntables, causing havoc on your records and affecting the stylus performance. Here’s how to tackle it:
- Plinth and Base:
- Use a soft brush or microfiber cloth to gently wipe away dust.
- Pay attention to nooks and crannies where dust likes to hide.
- Platter and Mat:
- Invest in an anti-static brush to sweep away surface dust.
- Remove the platter and clean it separately for a thorough job.
- Tonearm and Cartridge:
- A delicate touch is needed here – a stylus brush can be your best friend.
- Ensure the cartridge is securely attached and aligned.
Static Be Gone!
Static electricity is the sneaky villain that attracts dust to your vinyl like a magnet. Defend your records with these anti-static measures:
- Anti-Static Brushes: A quick brush before each play reduces static build-up.
- Record Cleaning Solutions: Invest in a quality solution to deep clean your vinyl periodically.
Belt and Drive Mechanism Maintenance
The Power Players: Belt vs. Direct-Drive
In the world of turntables, the source of rotation is a critical player. Let’s dissect the power players – belt and direct-drive mechanisms.
Belt-Driven Turntables:
- Smooth Operator: Known for their smooth and consistent rotation.
- Less Motor Noise: Belts act as shock absorbers, reducing motor noise.
- Subdued Vibration: Vibration from the motor is less likely to interfere with sound quality.
Direct-Drive Turntables:
- Instant Start and Stop: Offers quicker start-up times and precise stoppage.
- Consistent Speed: Direct connection to the motor maintains stable rotation speed.
- Popular in DJ Settings: Preferred by DJs for their quick response and durability.
Regular Inspection and Tension Adjustment
Why should you care about belts and tension? Well, just like a loose guitar string, a loose belt can throw off the harmony of your turntable. Follow these steps for a well-tuned turntable:
- Visual Inspection:
- Check the belt for signs of wear, like cracks or looseness.
- Ensure it’s properly seated on the platter and motor pulley.
- Tension Adjustment:
- If the belt feels loose, refer to your turntable manual for proper tension adjustments.
- Be cautious not to over-tighten, as it can strain the motor and affect performance.
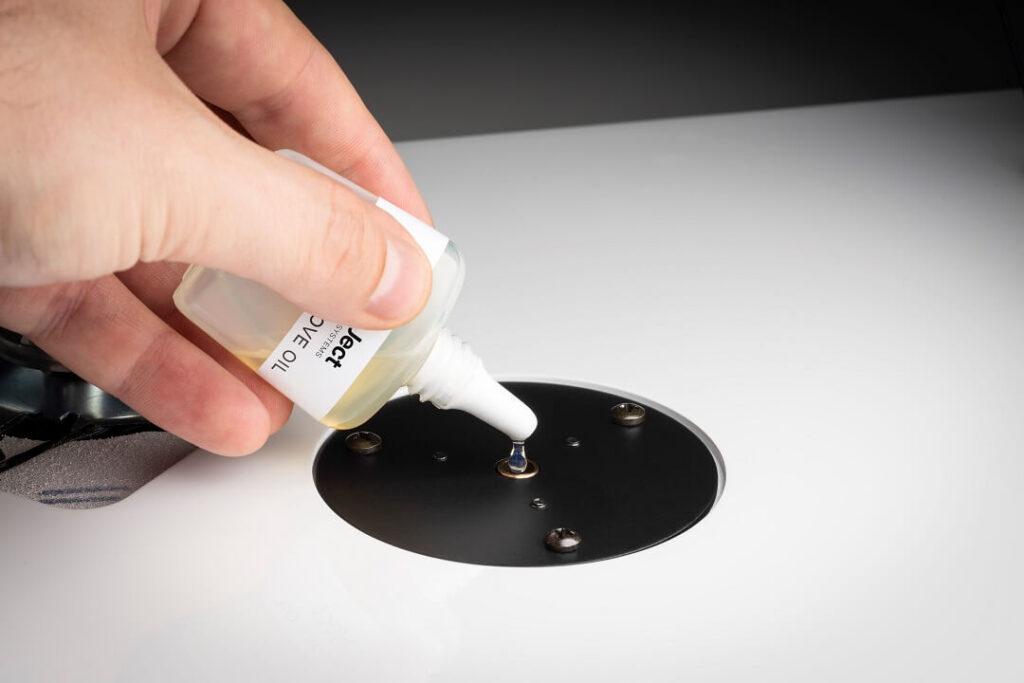
Lubrication for Smooth Sailing
Picture this: a well-oiled machine, gliding effortlessly through the vinyl landscape. That’s the magic of proper lubrication:
- Oil Types: Consult your turntable manual for the recommended oil type.
- Applying the Lubricant: A drop on strategic points, as suggested in the manual, keeps the gears moving smoothly.
- Frequency: Check and lubricate according to your turntable’s maintenance schedule.
Understanding the nuances of your turntable’s power source is like knowing the secret handshake to an exclusive club. It ensures your vinyl journey is free from hiccups and interruptions.
Tonearm Setup and Calibration
Balancing Act: The Importance of a Well-Tuned Tonearm
The tonearm, a slender yet mighty conductor of musical bliss, plays a pivotal role in the delicate dance between stylus and vinyl. Let’s delve into the art of balancing and calibrating to ensure your tonearm grooves in harmony.
Balancing the Tonearm for Perfect Harmony
- Tracking Force:
- Why is it crucial? Too much force can damage your records; too little can cause skips.
- The Balance Dance: Adjust the counterweight until the tonearm floats parallel to the platter.
- Anti-Skate Mechanism:
- What’s its role? Preventing the tonearm from exerting uneven pressure on one side of the groove.
- Finding the Sweet Spot: Align the anti-skate to match the tracking force, ensuring even wear on your stylus.
Cartridge Alignment: The Precision Point
- Visual Alignment:
- Align the Stars: Use a protractor tool to align the cartridge stylus with the grid on the protractor.
- Overhang Matters: Adjust the cartridge position to achieve proper overhang.
- Printed Grids and Stylus Placement:
- Precision is Key: Use printed alignment grids for meticulous stylus placement.
- Double-Check:* Confirm alignment with a magnifying glass for that extra precision.
Leveling the Playing Field
Ever seen a wobbly table ruin a dinner? Well, a wobbly turntable can wreak havoc on your musical feast. Ensuring your turntable is level is as essential as tuning a guitar before a performance.
- Leveling Tools:
- Bubble Trouble: A bubble level helps you achieve that perfect equilibrium.
- Precision Matters: Tiny adjustments can make a significant difference in playback quality.
- Firm Foundations:
- Sturdy Support: Place your turntable on a stable surface to avoid unwanted vibrations.
- Isolation Pads: Consider using isolation pads to further dampen vibrations.
Stylus Care and Replacement
The stylus, that tiny needle that traces the intricate grooves of your vinyl, is the unsung hero of your turntable. To keep the music flowing and your records grooving, it’s essential to give your stylus the care it deserves.
Regular Inspection: A Close Encounter
- Using a Stylus Brush:
- Dust Be Gone: Gently brush away accumulated dust and debris.
- Light Strokes: Employ delicate, downward strokes to avoid bending the stylus.
- Visual Examination:
- Magnifying Glass Magic: Use a magnifying glass to inspect the stylus tip for wear.
- Uneven Wear: If you notice uneven wear, it might be time for a replacement.
When to Say Goodbye
How do you know when it’s time to part ways with your stylus? Like any performer, styluses have a lifespan, and recognizing the signs of wear is crucial.
- Auditory Clues:
- Distorted Sound: If you notice distortion or a decline in sound quality, it might be due to a worn-out stylus.
- Skips and Hiccups: Increased skipping or hiccups during playback can signal stylus fatigue.
- Visual Inspection:
- Wear and Tear: Use a magnifying glass to check for visible wear on the stylus tip.
- Irregular Shape: A stylus should maintain a clean, conical or elliptical shape; any deviations may indicate replacement is due.
The Art of Replacement
- Consult the Manual:
- Manufacturer’s Guidance: Follow the turntable and cartridge manufacturer’s guidelines for compatible replacement styluses.
- Proper Installation: Ensure precise installation to maintain optimal performance.
- Professional Assistance:
- Expert Opinion: If unsure, seek advice from a turntable technician or audio specialist.
- Preserving Your Investment: Investing in a high-quality stylus is an investment in your entire vinyl setup.
Record Handling and Storage
Treating Vinyl Right: The Gentle Art of Handling
Vinyl records, with their groovy tunes and timeless charm, demand a delicate touch. Handling and storing your records correctly can make all the difference in preserving their magic for years to come.
Handling: The Dos and Don’ts
- Clean Hands, Happy Records:
- Wash Up: Always wash your hands before handling vinyl to avoid transferring oils and dirt.
- Hold by the Edges: Touch only the outer edges or the label to prevent smudges and fingerprints.
- Proper Insertion and Removal:
- Gentle Touch: When placing or removing records, use a gentle, circular motion to avoid scratches.
- Avoid Dropping: A dropped record can lead to more pops and crackles than a bowl of rice cereal.
Storage Wisdom: Where Your Vinyl Calls Home
- Vertical is Vital:
- Store Upright: Keep your records vertically stacked to prevent warping.
- Supporting the Spine: Ensure the record sleeves provide adequate support to avoid leaning.
- Temperature and Humidity Control:
- Cool and Dry: Store vinyl in a cool, dry place away from direct sunlight to prevent warping and mold.
- Avoid Extremes: Steer clear of extreme temperature and humidity fluctuations.
Cleaning Before Spinning

A well-maintained turntable meets a pristine record for a dance that transcends time. Cleaning your records before playback is a crucial step in ensuring an optimal listening experience.
Cleaning Techniques:
- Carbon Fiber Brushes:
- Dry Sweep: Use a carbon fiber brush to remove surface dust before each play.
- Gentle Pressure: Apply gentle pressure, allowing the brush to pick up debris effectively.
- Record Cleaning Solutions:
- Deep Clean: Periodically use a record cleaning solution for a more thorough cleanse.
- Microfiber Cloth Magic: Wipe records with a microfiber cloth after applying the solution.
Troubleshooting Common Issues
Navigating the Vinyl Maze: Solutions to Turntable Woes
Even with the utmost care, every vinyl enthusiast encounters the occasional hiccup in their musical journey. Fear not! We’re here to troubleshoot common turntable issues and get your vinyl playback back on track.
Identifying and Addressing Tracking Problems
- Check Tracking Force:
- Too Heavy or Too Light? Adjust the tracking force according to your cartridge specifications.
- Balancing Act: Ensure the tonearm is correctly balanced for optimal tracking.
- Inspect Stylus Condition:
- Wear and Tear: A worn-out stylus can cause tracking issues. Consider replacement if needed.
- Cleanliness is Key: Ensure the stylus is free from dust and debris.
Dealing with Speed Irregularities
- Belt Tension Check:
- Tighten Up: If using a belt-driven turntable, check and adjust belt tension for consistent speed.
- Direct-Drive Stability: Direct-drive turntables usually have more stable speed, but if issues arise, consult the manual for adjustments.
- Motor Lubrication:
- Smooth Operator: Regularly lubricate the turntable’s motor as per the manufacturer’s recommendations.
- Avoid Over-Lubrication: Too much lubrication can be as problematic as too little.
Resolving Tonearm Balance and Anti-Skate Issues
- Balancing Act Redux:
- Recheck Balance: Ensure the tonearm is still balanced, as adjustments may shift over time.
- Anti-Skate Alignment: Align the anti-skate mechanism with the tracking force for consistent performance.
- Anti-Skate Calibration:
- Match the Force: Ensure the anti-skate setting matches the tracking force for even weight distribution.
- Trial and Error: Fine-tune the anti-skate for optimal results, and don’t be afraid to experiment.
Troubleshooting Sound Quality Problems
- Cartridge Alignment:
- Visual Check: Reconfirm that your cartridge is aligned correctly using the recommended tools.
- Professional Assistance: If sound quality issues persist, consult a turntable technician for expert advice.
- Grounding and Cables:
- Secure Connections: Check that all cables are securely connected and free from damage.
- Grounding Wires: Ensure proper grounding to minimize interference and improve sound quality.
The Song Never Ends
In the world of vinyl, the song never truly ends. By establishing a regular maintenance schedule, you’re not just caring for a piece of equipment; you’re preserving a timeless connection to music. So, keep the records spinning, the needle gliding, and the music alive – because in the realm of vinyl, the symphony never truly concludes.
Frequently Asked Questions (FAQ)
Q1: How often should I clean my turntable?
A: It’s recommended to perform a quick dusting of the plinth, mat, and stylus on a weekly basis. For a more thorough cleaning, including the platter and mat, a bi-monthly schedule is ideal.
Q2: How do I know when to replace the stylus?
A: Keep an eye (or ear) out for signs of wear such as distorted sound, increased skipping, or visual irregularities on the stylus tip. If you notice these, it might be time for a replacement.
Q3: Can I use any cleaning solution for my records?
A: While some DIY solutions exist, it’s best to use a dedicated record cleaning solution. Avoid harsh chemicals, as they can damage your vinyl. Always follow the manufacturer’s recommendations.
Q4: How do I troubleshoot tracking problems?
A: First, check and adjust the tracking force according to your cartridge specifications. Ensure the tonearm is properly balanced, and the stylus is free from debris. If issues persist, consult the troubleshooting section for more detailed steps.
Q5: Why is balancing the tonearm important?
A: Balancing the tonearm ensures that the stylus applies the correct amount of pressure on the record. Too much or too little force can lead to tracking issues, stylus wear, and overall sound quality degradation.
Q6: Is it normal for my turntable to make noise?
A: Some low-level noise is normal, but excessive noise could indicate issues with the motor or other components. Regular maintenance, including lubrication, can help minimize unwanted sounds.
Q7: How often should I replace the belt on my turntable?
A: Belt replacement frequency depends on usage and wear. Inspect the belt regularly for signs of wear, and if it appears cracked or loose, it’s time for a replacement.
Q8: Can I lubricate my turntable’s motor myself?
A: Yes, but it’s crucial to use the recommended type and amount of lubricant. Over-lubrication can be as problematic as insufficient lubrication. Follow the manufacturer’s guidelines carefully.
Q9: What should I do if my turntable speed is irregular?
A: For belt-driven turntables, check and adjust the belt tension. Direct-drive turntables may require motor calibration. Follow the troubleshooting steps related to speed irregularities in the guide for more detailed instructions.
Q10: How can I find a reliable turntable technician for professional check-ups?
A: Seek recommendations from fellow vinyl enthusiasts, audio forums, or your local audio equipment store. Look for technicians with experience in turntable maintenance and positive reviews from customers.


